
Adding Texture To A Picture
By: CindyLew
Adding Textures to your photos in Photoshop is like
creating a Collage in Mix Media work. When you add layers to your collage you
add them with Gel Medium, Texture Paste, or whatever your choice of adhesive is
to layer one thing on top of the other to create your Collage. With Textures in
Photoshop, you use the mouse and various Textures added on top of each other,
along with changing the Blending Mode to make the desired effects. You can also
use different Filters, Photoshop Brushes, Shapes and various other tools within
Photoshop to change the dynamics of your photo (more tutorials coming). You can
add Photos on top of Photos and create a Montage; the possibilities are endless
and all you have to do is have the basic idea of how the program works and you
will be off and creating in no time. Just think of it as using your mouse and
features in Photoshop as your canvas and brushes and you will learn to create
photos that you never dreamed possible.
To acquire your own textures you can scan or photograph
your own, or check out sources like Flickr: http://www.flickr.com or Deviant Art: http://www.deviantart.com for
literally thousands of free textures that you can use in your work. The
textures that I am using today are from Deviant Art. You can just type in Textures
in the search box and download them to your computer. I would make a folder
named “Textures” and save all the textures in one place, that way you will
always know where they are. I am going for a vintage/grungy
look, so I will use the “Vintage Textures” that I downloaded from - http://www.smashapps.org/2009/07/42-free-photoshop-textures.html
A couple of things
about how I do step by step directions:
When
you see the “quotes around something”,
you will know that is a step that you need to take. I usually try and number
them also, so you can keep track. I will also do screen shots of how to do it,
but remember; your screen may look a little different than mine.
In the future I hope to do videos, but
I am waiting for the software to arrive that I ordered and then of course the
learning curve to figure out how to use it and edit the videos. But hope it
will be soon.
Adding Texture To A Picture
Open Photoshop or Photoshop Elements… I will just
use PS from here on out for ease. I
am using Photoshop CS5 so if it looks a little different then what you have
that is ok, it will still work the same way.
Downloading
the Texture:
Download the pictures/textures to your computer so
you can use the same pictures I am using and get the same results. After
completion of the tutorial go back in and change the blending modes to see how
each blending mode changes the image. To download the pictures/textures you
will need to right click on the “texture 3.jpg, texture 5.jpg and the
sunflower.jpg picture” (right side of mouse) &; “Save Picture as”: You do
not need to rename them but I would save it on your desktop so you can easily
find it. Flip your dropdown menu at the top of the screen and select “Desktop”&;
Click: Save”. |
| Sunflower |
 |
 |
| Texture 5 |
Open the pictures:
1. “File>;Open,
(browse out to the desktop or wherever you saved the pictures) “Click&>;Open.
Open all three pictures: Sunflower, Texture 3 &; Texture 5.
Make sure all three pictures are open before you begin.

2. When
I bring in a photo from the Internet I usually take off the background lock and
make it a layer of its own. To do this, you can double click on the word “Background”
in the “Layers Palette”. A box will come up asking you if you want to
make this picture a “New Layer” &; Click>OK”. That will take the lock off and
allow you to make any change you want to the picture. Click on the “Sunflower.jpg”
picture. Double click on the “background” lock: “Click OK” when
the box comes up. You can name it if you would like. I typed in “Sunflower”,
which names the layer.

3. Click
on the “Move Tool” in the “Tool Bar” (the first tool). Select “Texture
1.jpg” Click anywhere in the middle of the “Texture 1” picture. Hold
the mouse down and drag it into and on top of the “Sunflower” picture and
release the mouse. Move the “Texture” around until you see parts
of the texture that you would like to show in the picture. You can do this by
moving the “Texture” around with your mouse; make sure the “Move
Tool” is still selected. When you do this you will only see
the texture. If you see the Sunflower, look in the “Layers Palette” and make
sure you can see both of the “Icons” and drag the texture to the
top layer. To do that, just click on it and hold down with the mouse and drag
it to the top.


4. Click
on the drop down menu in the “Layers Palette” to change the “Blending
Mode to Multiply”. The “Texture” is larger than the “Sunflower”
picture, so just move it around until you like the texture that is showing.

5. Click
on the “Opacity” drop down arrow and slide it to around “60%”.
This will lighten up the “Texture” and give the image a
vintage look.

6. Do
the same thing with “Texture 2.jpg”. Click
on the “Move Tool” in the “Tool Bar” (the first tool). Select “Texture
2.jpg” Click anywhere in the middle of the “Texture 2” picture. Hold
the mouse down and drag it into and on top of the “Texture 1” & “Sunflower” picture
and release the mouse. Move the “Texture” around until you see parts
of the texture that you would like to show in the picture. I used the top left
hand portion of the “Texture 2” picture as shown because I liked the grunginess in
the corner of the picture.

7. Click
on the drop down menu in the “Layers Palette” to change the “Blending
Mode to “Overlay”. The Overlay
feature lightens the image. Try different Blending Modes to see how they
interact with each other. You can move the layers to different effects.

8. Click
on the “Opacity” drop down arrow and slide it to around “75%”.
The will lighten up the “Texture” and make the “Texture” more transparent.

9. I
renamed the layers by double clicking on layer in the “Layer Palette” and
renaming them and saved the project as a “PSD” file:
“Click
File>Save As>“Sunflower.psd”, which is the format for Photoshop.
You always want to save the file as a “PSD”
when you are done so you can get back to the original and make changes if you
want too later. If you only save it as a “JPG” (photo format) you cannot get
back to the layers and therefore you cannot make changes to the picture. Trust
me……….. I have done this, which means if you want to make changes you will have
to recreate the whole thing over again.


10. Once you are happy with
the way the photo looks you can save it as a “JPG”: “Click File>Save As> (flip
the drop down and click on the “jpg” format) Sunflower.jpg”.

Hope you enjoyed the tutorial and you learned something. Please leave me a comment and let me know what you think.
Love, Light, & Harmony ~ CindyLew

Photo Merge
Tutorial
Merging Two
Photos Together Using the Gradient Tool
This will just be a quick and easy
way to merge two photos together using the Gradient Tool.
BY:
CINDYLEW
I have had several requests to show how to make a collage using
various pictures. This process can be used for many reasons; pretty much
anytime you would like to combine pictures together this process can be used. I
think out of all the tutorials I have come up with; creating a Collage has to
be the one my high school students like the most, so I hope you enjoy it also.
I picked a set of pictures that are easy to find, however, I
will provide the pictures for you to complete the tutorial. Please note that
these pictures were taken off of the Internet and they are not mine, but the
tutorial is created by Me (Cindy Lew’s Studios); so please do not reproduce or
distribute the tutorial. After completion use pictures of your own so there
will be no copyright issues to worry about on your blog or website.
A COUPLE OF THINGS
ABOUT HOW I DO STEP BY STEP DIRECTIONS:
When you see the “quotes around
something”, you will know that is a step that you need to take. I usually
try and number them also, so you can keep track. I will also do screen shots of
how to do it, but remember; your screen may look a little different than mine.
Downloading
the Pictures:
Save the pictures to your computer so you can use the same
pictures I am using for this project.
You may want to make a folder on your desktop to save the work in; that
way you will know where everything is. You can just right click on the desktop
and go to “New”>Folder: Name the folder and start saving:-). To download the pictures you will need to click on
the picture first so it comes up in a window of by itself; right click on “PICTURE
1 AND PICTURE 2,” (right side of mouse) > “Save
Picture as”: Save the pictures in
the folder or on your desktop.
 |
| Picture 1 |
 |
| Picture 2 |
1. Open
Photoshop or Photoshop Elements, if you are using Elements use it in full edit
mode… I will just use PS from
here on out for ease. I am using Photoshop CS5 so if it looks a little
different then what you have that is ok, it should work the same way.
2. Open the
pictures: “File>Open: Go out to where you saved the pictures. Open both
pictures”.

3. Create a
new document: “File>New: Make the document 1100 pixels X 1100 pixels, 72
Resolution and Background Content as White”. “Click OK, when you have made all
the selections”.

4.
Use the “Drag and Drop” method to get the
pictures into the blank document. “Click on the move Tool” “Click and hold
down the mouse and drag” each picture into the “Blank Document”. “Arrange
them in the blank document as shown below”.

5.
When you make your own picture make sure to check
the size of the pictures. They should be close in size so that when you merge
them there are no issues with the border. You will always need to do some
cropping after you are done. But checking the size up front may save you time
later.

6.
You can check the size by either right clicking on
the top bar of the photo as shown, or go to “Image>Image Size”
that will bring up a box showing you the size of the picture.
7.
Make sure the “Ocean-Picture
1” is overlapping the “Drift Wood-Picture 2” as shown, about half way
down. Otherwise the white from the Ocean Picture will make the Gradient come
out looking funny. If you don’t get it right the first time, just pull the “Gradient
Box” from the Layers Palette to the trash can and make a new “Gradient”
and start over again.
8.
Once you have both photos set up in the “Blank
Document”. Click on the top layer (ocean) to make it active. Click on
the “Layer
Mask Icon” at the bottom of the Layers Palette; a white box will show
up next to the picture.

9.
Click on the “Gradient Tool” on the Tool Bar. It
might be under the “Paint Bucket”. If so, just click and hold the mouse down until
the pop-out screen comes up and select the “Gradient Tool”. After clicking the “Gradient
Tool” the “Click to edit the Gradient” box will show in the “Options Bar”.
Make sure that the “Linier Gradient” is selected. Click the “Edit Box” and the “Gradient
Editor Box” will come up with different Gradient Options.

10. Click on the third one over “Black to White” and Click “OK”

11.
Make sure you are clicked on
the
“Layer Mask” (white box) and then click on the Gradient Tool and click
and hold down the mouse as shown in the picture. Do this 3 times as shown in
about the same area as the arrows. If you have problems with it, either you can
undo the by clicking “Edit>Undo” or “Ctrl Z”.

12. Click and drag from the
bottom up as shown by the arrows. That will make the pictures blend into each
other.
13. After that you are done.
Hope you enjoyed the Tutorial. I have another more detailed Collage Tutorial
that I am working on, so that will be up soon.

Hope you enjoyed the tutorial and you learned something. Please leave me a comment and let me know what you think.

Creating
a Collage/Montage
BY:
CINDYLEW
I have had several requests to show how to make a collage using
various pictures. This process can be used for many reasons; pretty much
anytime you would like to combine pictures together this process can be used. I
think out of all the tutorials I have come up with; creating a Collage has to
be the one my high school students like the most, so I hope you enjoy it also.
I picked a set of pictures that are easy to find, however, I
will provide the pictures for you to complete the tutorial. Please note that
these pictures were taken off of the Internet and they are not mine, but the
tutorial is created by Me (Cindy Lew’s Studios); so please do not reproduce or
distribute the tutorial. After completion use pictures of your own so there
will be no copyright issues to worry about on your blog or website.
The following is a list of techniques you will
learn while completing this Tutorial:
learn while completing this Tutorial:
·
Saving In .PSD and .JPG
·
Creating A Blank Document
·
Using The Move Tool To Drag & Drop Images
·
Rearranging Layers In The Layer Palette
·
Excepting Changes By Clicking the Check Mark (Tick)
·
Creating Layer Masks
·
Making Changes To The Layer Mask
·
Using The Brush Tool
·
Using The Free Transform Tool or (Ctrl + T)
·
Adjustments To Color Using the Hue & Saturation
·
Changing The Settings In The Layers Palette
·
Renaming Layers In The Layers Palette
·
Learning To Use Textures and The Blending Mode
·
Changing The Opacity On Images
·
Adding Font/Text To The Project
A COUPLE OF THINGS
ABOUT HOW I DO STEP BY STEP DIRECTIONS:
When you see the “quotes around
something”, you will know that is a step that you need to take. I usually
try and number them also, so you can keep track. I will also do screen shots of
how to do it, but remember; your screen may look a little different than mine.
I cannot stress this enough!!!!! When
working on a project that is this complex you want to make sure you save as you
go along. I cannot tell you how many times I have lost everything I have worked
on for hours just because I did not save as I was working. So from the
beginning, Go To: File>Save As>
and save the project with whatever name you choose. But ALWAYS save it as a .PSD
file first and as you are working. So it will look something like “Project.psd”. Once you have done the “File>Save As: the first time you can
always just use the “Short Cut” keys to save, which is “Ctrl S”. That way you are saving as you go and
you will not lose any of your work. You will always need to save in the .PSD format so you can get back to your
“Layers” to make changes. Otherwise, as a .JPG, you can only see the
picture, not the Layers.
Creating
a Collage/Montage
Downloading
the Pictures:
Save the pictures & texture to your computer so you can use
the same pictures I am using for this project.
You may want to make a folder on your desktop to save the work in; that
way you will know where everything is. You can just right click on the desktop
and go to “New”>Folder: Name the folder and start saving:-). To download the pictures/texture you will need to
click on the picture first so it comes up in a window of by itself; right click
on “PICTURE
1, PICTURE 2, BOOKS, FLOWER, BACKGROUND, and TEXTURE” (right side of mouse) > “Save
Picture as”: Save all the
pictures and texture in the folder or on your desktop.
1. Open
Photoshop or Photoshop Elements, if you are using Elements use it in full edit
mode… I will just use “PS” from here on out for ease. I am using
Photoshop CS5 so if it looks a little different then what you have that is ok,
it should work the same way.
2. Create a
new document: “File>New: Make the document 900 pixels X 600 pixels, 72 Resolution
and Background Content as Transparent”. “Click OK, when you have made all the
selections”.


3. Open the
pictures: “File>Open: Go out to where you saved the pictures. Open all of the
pictures and the texture”. So
you should have 7 images open and the blank document that you created.
4. Use the “Drag
and Drop” method to get all of the pictures into the blank document. “Click
on the move Tool” on the Tool Bar”
. Click and hold down the mouse
and drag each picture into the blank document individually. “Arrange
them in the blank document as shown”. Don’t drag the “Texture
or the Flower” over yet, just the pictures, books, and the background.
You can minimize the Texture and the Flower for now, so it is not in your way,
or close it until you need it.


5. I rotated “PICTURE
1.jpg” to face in the other direction. It just makes all of the
pictures fit together better with it facing the other direction, so it is up to
you if you want to rotate it or not. To Rotate: “Click on PIC 1.jpg” to
make it active. From the “Menu Bar” at the top, Go To: “Edit>Transform>Flip
Horizontal”. You will also need to resize it to fit the screen as
shown. While PIC 1.jpg is still active; Go To: “Edit>Free Transform”.
A bounding box will come up around the picture. Hold the “Shift Key” down and with
your mouse drag the top right corner of the picture in and down. Once you have
it the size you want it you will have to hit the “Enter” key otherwise you
will not be able to do anything else until you have accepted the change.


6. Whenever
using the “Free Transform” or (Ctrl T)
for the shortcut, you will always have to hit enter to except it or click the “Check
Mark” at the top of the screen in the “Options Palette”.


7. Before you
start blending the pictures, make sure they are in the order as shown in the “Screen
Shot”. The top layer is the picture in the front of all the other
pictures, as the bottom is behind all the pictures. To change which layer they
are on, just “Click” and hold down the mouse and “Drag” the picture to the
top or whatever layer you want it to show up on. (I hope this makes sense to
you) Because sometimes “Layers” can be confusing, but it is
one of the most important aspects of using Photoshop correctly. If in doubt,
always make another layer (another tutorial).
8. Now that
you have all the pictures in place you will need to start blending them
together. For this, we will use a “Layer Mask” on each layer. Before
you begin make sure you can see your entire screen, if you need to zoom out a
little so the whole screen is visible. That way you will be able to see how
each layer should be blended into the next one.
a.
You will notice that
when you click on the layer mask the colors in the color picker turn to black
and white. The secret of Layer masks: Depending on what the settings are, the
color”WHITE”
shows or reveals the image AND the color
“BLACK”
hides or masks the image (We’re talking
about the image on which the layer mask is applied, not the layer below it).
b.
You can use the “
Left & Right Bracket Keys” above the enter key to make the brush
smaller or larger. It will make it much easier to switch from one size to
another rather than going up and changing the size from brush palette.
9. Make sure
you are clicked on “Pic 1”, the main picture. Click on the “Layer Mask” Icon at the
bottom of the “Layers Palette”. A white box will show up next to the picture
icon. When you click on the Layer Mask Icon it will automatically change the
color palette for the “Foreground and Background” to
“Black on White” Black being the Foreground color and White the Background
color. That is what makes the process work.


10. Click on
the “Paint
Brush” on the “Tool Bar”. Select a “Soft Round Brush” (kind of looks like it
has a halo around it). Make the size of the brush anywhere from “80
to 100 pxls and the “Hardness to 0%”. Make sure the “Layer
Mask” is selected (click on white box) and start
painting around the outer edge of the picture (hold the mouse down and go
around the edges). The edges will start to disappear. Do not paint too
much at one time, or take too much away at one time. If you do, you can always
do one of the following: Use “Ctrl
Z” to undo it, or use your “History Palette” and click up until
you get some of the picture back. Or……… You can switch the color palette from “Black
on White to White on Black” and paint over the parts that you want to
show up. Remember “White” reveals and
“Black” hides. Go around the picture until all the edges are gone: As
shown. I went around the edges with a
size “10 pxl Brush” so I could get the detail of the flowers and other parts of
the picture. Don’t worry that you can
see so much of the background, when you add the texture some of that will go
away and make everything blend better. You do not have to make the mask perfect
because in the end a lot of it will blend in.


11. For now, turn off the picture of the “books”
so you can see the whole picture of the flowers and the can that they are in. “Click
the Eye Icon” to turn off the picture. Click on “Pic 2”, the yellow
flowers. Click on the “Layer Mask” Icon at the bottom of
the Layers Palette. Click on the “Paint Brush” on the “Tool
Bar” and start painting. All the settings should have stayed the same,
but if you see “Black” strokes instead of the picture disappearing, just undo (Ctrl Z) and click on the “Layer Mask Box- “White
Box)” and start painting to remove unwanted borders again.


12. I already made the “Books” Transparent so you do not have to use the
Layer Mask on them. You can just resize them by using the “Free Transform Tool” or
“Ctrl T” to make them fit as
shown.


13. Click on the “Flower.png” picture.
Drag the flower into the main document. Use “Ctrl T” to transform the flower and make
it smaller to fit in-between the two main pictures. When using the “Free
Transform Tool” hold down the “Shift Key”, that will keep the picture
in proportion as you are resizing it.
14. I placed two of the same flowers in the main
document by dragging the picture of the flower in twice. When you do this it
makes a layer of its own, so you do not have to worry about creating a layer to
put them on.
15. I changed the color of one of the flowers by
using the “Adjustments”. If you want to change one of them also: From
the Menu Bar - Go To: “Image>Adjustment>Hue &
Saturation” and put in the numbers as shown on the “Screen Shot”, “Click OK”
when you have made the changes. I turned the flower yellow, but you can change
it to whatever color you want buy moving the “Hue” slider.


16. Check your screen to make sure you have all
the Layers in the correct order; if they are not, click on the Layer and drag
it to the correct position (click on the layer and hold down the mouse and drag
up or down). I labeled most of the Layers so it would make it easier for you to
see which Layer is which. You can do that by “Double Clicking” on the
word “Layer”
next to the picture and typing in the name when the little box comes up. It is
a good idea to do this because if you have a lot of Layers it will help you
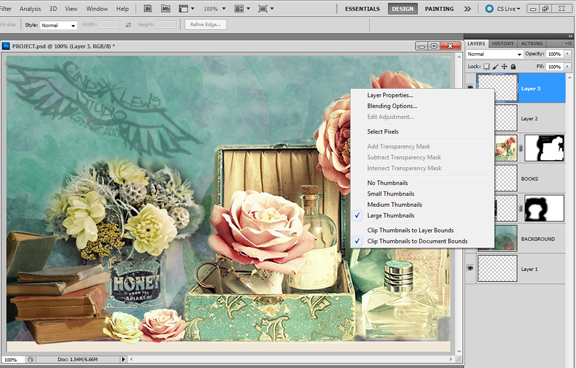
keep track of them. I also have my layers on the “Large Setting” so it is
easier for you to see the picture that we are working on. You can change the
size of the “Icon Settings” by “Right Clicking on the actual “Picture Icon”
as shown and choosing the setting that is best for you.


17. Now you can either leave the picture the way
it is or make a few more changes to it to make it look more “Vintage
Looking”.
18. Now for the “Texture”. I used the
same Texture twice on this project. If you do not have the “Texture.jpg” open, go
ahead and open it now. Drag it into the Collage: Select the “Move
Tool” and hold down the “Shift Key” while dragging it into
the main document, it will place the picture in the correct position so you do
not have to move it around. If you don’t use the “Shift Key” you will just
have to move it around and make it fit the screen. That is just a little trick,
no need to use it if you do not what to. Click and drag the “Texture
Layer” to the “Top Layer” in the “Layers Palette”,
so it is at the very top of all the pictures. Click on the “Blending Mode” dropdown and
select “Soft Light”. Take the “Opacity” down to around “40%” or
whatever looks good to you.


19. Click and drag another copy of the “Texture.jpg”
into the main document again. This time drag it to the bottom of the screen,
just above the “Background Layer”.
Click on the “Blending Mode” dropdown and select “Soft Light”. Take
the “Opacity” down to around “70%” or whatever looks good to you. You
can try different “Blending Modes” out and see how they look. The “Soft
Light” gives it a softer more blurry look, while the “Overlay”
gives it a brighter look. Really the possibilities are endless in what
you can do with “Textures” and Blending Modes” together.


20.
Now is when you can go back and
tweak the pictures a little. If you want to move them around a little, or if
you need to remove more of the picture, make sure you click on the “Layer
Mask” (White Box). Check to make sure the “Background/Foreground colors are
“Black on White” and click on the “Paint Brush” and remove or add too.
To add too, switch the “Background/Foreground” colors to “White on
Black”.
21. I made the following changes to the
“Collage”.……Click on each Layer and make the changes to the “Opacity” on each
picture individually. Picture 1: “Opacity”= “95”, Picture 2:
“Opacity”=“95” also, The Books: Opacity=”85”, The “Yellow Flower” or “Flower
1”: “Opacity=”84”, and The “Pink Flower” or “Flower 2”: “Opacity=”80”.
22.
You are done, so if you have not saved yet, do
so now. First save as “Collage.psd”
and then go back and do “File>Save
As: “Flip the dropdown to .JPG and save as”: “Collage.jpg”. The “.JPG file”
is the file you will upload to your “Blog or Website”. Never upload a “.PSD”,
the file size is way too large. You save your file to work on in a “.PSD
Format” and you save your file as either a “.JPG, .GIF, or a .PNG File Format
for your site. GIF and PNG gives the pictures transparency, which means you can
see through the picture. Like the “Flowers”.


23.
I almost forgot that I put “Text”
in. I will do another Tutorial on Text and how you can make changes to the way
it looks, but for now. “Click on the “Text Tool” in the Tool Bar.
“Click” one time in the document and start typing. It does not matter
what “Font”
it is at first, just “Type In” what you want and you can
back and change the “Font Style” and “Size” when you are done. Click the “tick”
to select it. You can move the Text around with your mouse by clicking on the “Move
Tool” and just moving the text to desired location on screen. When
making a Logo for you Blog or Website you would probably make the dimensions
more like “900 pxls X 300 pxls”. It is really up to what size you have
your blog set to that is the deciding factor on the width.
24.
Make sure you save as a .PSD file when you are
finished with the tutorial. After saving as a .PSD go back and do save again as
either a .JPG, PNG, or GIF file.. I will
do a tutorial on the different file formats available to you for picture and
the difference for the web and for printing in the future.


25.
I hope you enjoyed the tutorial. I know there
is a lot to learn in this so take your time and enjoy the outcome. The
possibilities are truly endless once you have learned these steps. You can
always go back and repeat the tutorial again so it becomes a little easier to
understand the process.


Thanks Cindy...I just read it...have not actually done it yet...but will on the weekend. Seems really clear and if I can understand it then anyone can:) Would you be doing any tutorial in how to put your own fotos into a header for on blogs? Have a good week!
ReplyDelete